There’s something very Steinbeck about the idea of getting up with the sun, poking the coals, and pouring yourself a rough, gritty cup of coffee with that delicious aroma to shock yourself awake before a day of doing…whatever it is that John Steinbeck’s characters got up to. Ambient suffering, mostly, I think.
But for some of us, coffee isn’t just a morning necessity – it’s a way of life. And, for coffee drinkers, the idea of making a cup of subpar coffee is borderline sacrilegious if you’ve got high standards.
You don’t have to sacrifice taste for convenience when you’re out in the wilderness, especially now that the market is constantly being updated with new, efficient options for adventurers who like the finer things in life. Like finely ground coffee.
See what I did there? I’m here all week.
I’ve been traveling and exploring the outdoors for a better part of a decade—and drinking coffee for even longer. There are so many ways to make coffee while camping, all depending on how serious you are about taste, convenience, and process. I’ll teach you how to make coffee while camping, whether you’re cowboy camping, car camping sleeping in a tent, or living it up in a campervan or RV.
These are ten of my favorite brew methods for that perfect cup while camping!
1. Instant Coffee
- Pros: Quick, easy, and idiot-proof. Doesn’t require a sophisticated coffee maker
- Cons: Not fresh ground coffee, so the taste isn’t as good as many other methods
- Best for: No-fuss, no-mess morning brews that’ll come out the same even if your brain is still in your sleeping bag
For years, instant coffee has felt like the only real viable option for campers, and that’s all well and good if you don’t mind the taste (but, admittedly, there’s a growing number of brands on the market that are actually putting out some good instant coffee grounds).
Coffee snobs need not apply: we know there’s no persuading you to join the ranks of the instant coffee brigade. But if you want the quickest and easiest possible morning joe, with absolutely no preparation or clean-up required, you can’t go wrong here.
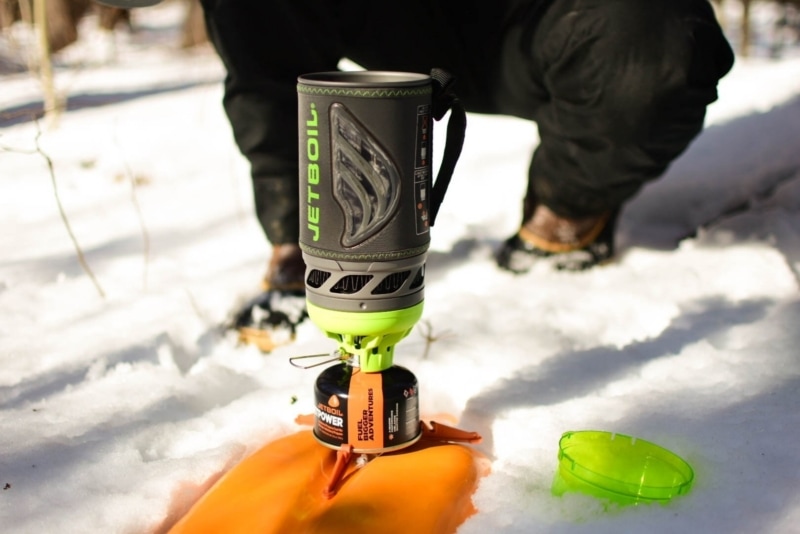
All you need to make an instant cup of Joe is your individual packet of grounds and some water. I like to boil 12oz of water in my Jetboil and add it to the grounds in my favorite camp mug—and voilà! Instant joy! I mean…coffee.
The Best Instant Coffee Brands
Instant coffee has a bad reputation, especially among coffee enthusiasts. As someone who really loves coffee myself, here’s my take on two brands that actually make a good cup of instant coffee.
- Alpine Start: This is my go-to instant coffee brand. They have a wide variety of instant products, including a black coffee, coffee with creamer, chai latte, and even an instant matcha mix. They are a staple among the backpacking and climbing community as a great, easy coffee.
- Verve: This craft coffee company makes a variety of instant coffee options for those who still want the clout of the brand when sipping on their pour, stir, and sip coffee. Verve is well-known in the coffee community, and they offer the most instant coffee options of almost any roaster out there. And they actually taste good!
2. Cowboy Coffee
- Pros: Always an option, when all else fails. Easy and idiot-proof. Only requires a pot, some water, and your grounds.
- Cons: Can end up a bit gritty, and the taste isn’t as sophisticated (hence the name ‘cowboy’)
- Best for: When your grounds are the only thing you remembered to grab on your way out the door.
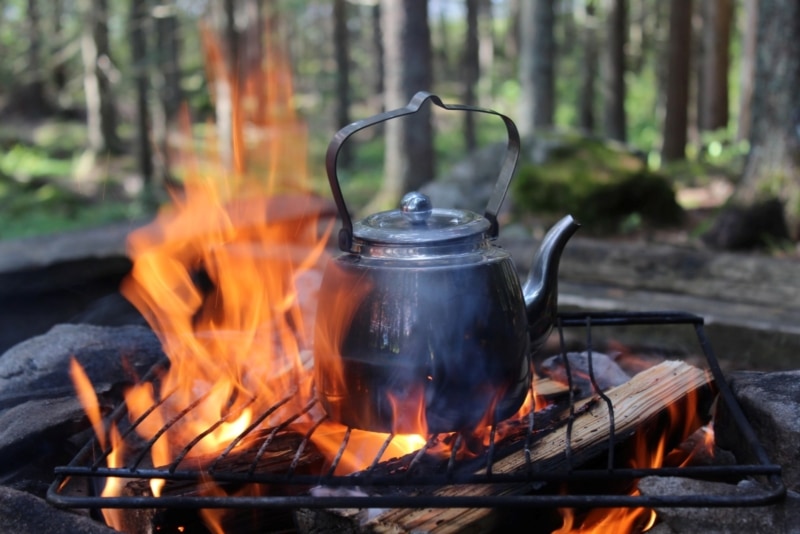
Okay, hear me out, because you’re not going to like the sound of this. But if you’ve headed out for your camping adventure only to make the devastating realization that you left your coffee maker at home, you’ll be relieved to hear that you’ve got an option.
It’s a little bit rough and ready, but it is going to sort your need for some caffeine.
First, heat your water up until it’s at a low boil. Don’t overheat your water—that’s how you end up with burnt, bitter coffee. Then, add your coffee grounds to the pot and return to a simmer.
After a few minutes, the grounds will begin to sink to the bottom of the pot. You can add some extra cold water to encourage this process or use a spoon to skim the remaining grounds from the surface.
When your coffee is ready, gently pour it into a camping mug so you don’t disturb the grounds. But if you do get a bit of, um, texture to your cup of coffee? Consider it a way of connecting with nature, or something.
You can even try the Minnesota equivalent and add a slurry of beaten egg (shell, and all) to the pot to create a deeper flavor. I’ll pass, but you do you, buckaroo.
What You’ll Need to Make Cowboy Coffee
- Jetboil or a cooking stove to heat your water.
- Jetboil Silicone Coffee Press: If you’re using a Jetboil, use this handy little tool to keep those pesky grounds out of your way when you’re making cowboy coffee. In a way, this resembles a french press, but really just keeps the grounds out of your cowboy coffee while you’re pouring after you brew it.
3. AeroPress
- Pros: Reasonably priced, durable, and available in a compact travel size
- Cons: Not ideal for large groups as only brews one cup or thermos at a time
- Best for: The coffee aficionado in the wilderness ready to try a new method on his or her next camping trip
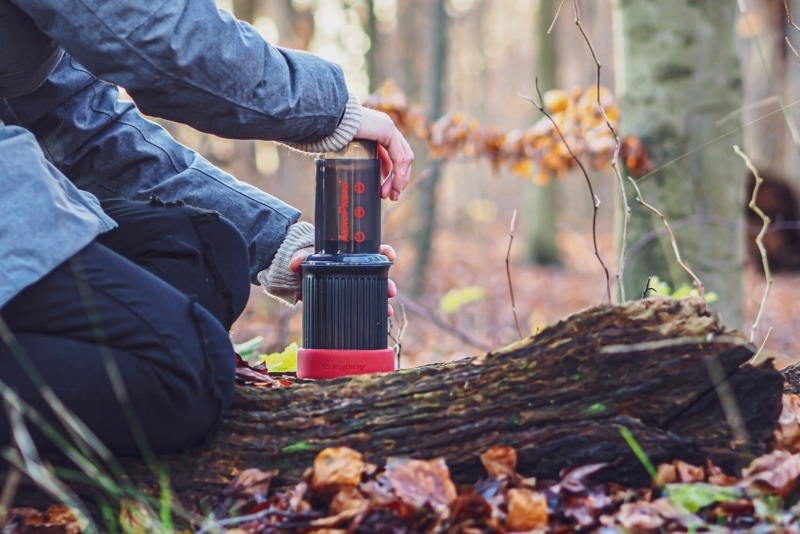
The AeroPress is among the most popular camp coffee makers on the market, particularly if you’re fussy about your cup of joe.
Billed as a hybrid between a French press, a pour-over, and a pneumatic press, it makes seriously rich coffee – just the thing to get you up and at ’em on a crisp morning.
It’s also pretty speedy and easy to clean, which has contributed to its popularity among the camping community. All you need is the ability to heat up some water, and you’re good to go.
To make fresh brew coffee while camping with an AeroPress, simply follow these instructions.
How to Use an AeroPress While Camping
- Bring water just under a boil—about 200 degrees Fahrenheit on your camp stove
- Put a filter in the Aeropress’s basket and attach it to the brewing chamber, before attaching it to your coffee mug or serving carafe
- Then, you can add your medium-finely ground coffee, using approximately 1.5 tablespoons per cup
- Add hot water to the brewing chamber
- Give it a good stir for around ten seconds, then leave it alone to settle and begin the drip
- As the brewing chamber empties, add the rest of your water
- Finally, insert the Aeropress’s plunger and slowly press it down for 10-15 seconds until you can’t go any further
The Best AeroPress Coffee Maker
Although several brands now offer a take on the classic AeroPress design, I am a sucker for the original AeroPress. The AeroPress Go is the best on the market for camping. It’s affordable, compact, and easy to use—things that are really important for any camping gear.
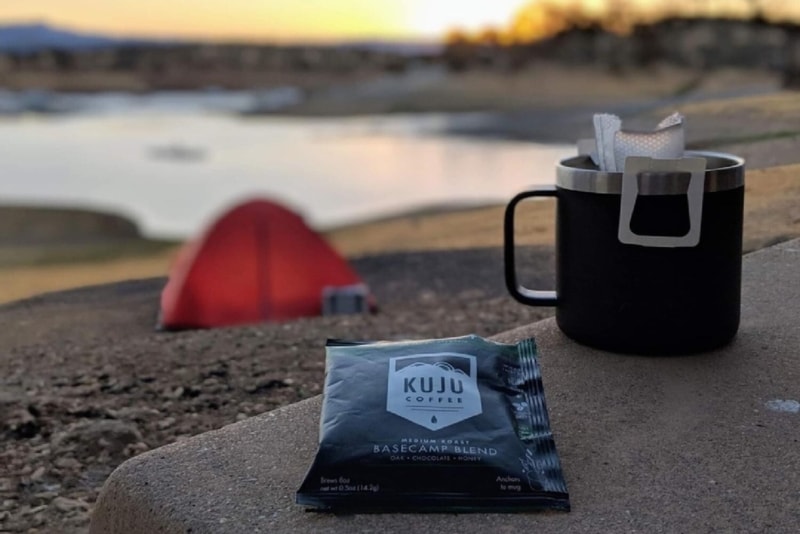
4. Coffee in a Bag
- Pros: No grinder needed. One of the easiest options with no preparation or clean-up, and the coffee brews quickly.
- Cons: Not as robust in flavor as some other options—more akin to an instant coffee.
- Best for: Large groups and people with a need for speed!
One of the most convenient methods for making a quick cup of Joe is a coffee bag. If you’re also a tea person, this may be your new favorite method for quick camp coffee. Coffee bags work in the exact same way as a tea bag. They simply need to be steeped in hot water until your coffee is the strength you like it at.
It’s a bit of an upgrade from instant coffee, generally, and there are plenty of brands entering this new market with some exciting flavors and high-quality offerings.
I like to boil a big pot of water and steep 2-3 sachets in an oversized Thermos to brew enough for my friends and me, or to have some for the morning and as a warm treat at the summit. It only takes five minutes to steep a great cup of camping coffee in a bag, making this a nice, speedy option.
The Best Coffee in a Bag
- Purity Coffee: With different roast options, and even a decaf product, Purity makes the cleanest coffee in the game. Lab-tested by third parties, their beans are organic and non-toxic. You can buy packs of five sachets, perfect for a quick weekend camping trip with friends!
- Grounds & Hounds: This dog-centric brand is perfect for those outdoor enthusiasts traveling with their adventure buddy. They sell a pack of 10 bags for a slightly lower price point than Purity, and each purchase goes toward their mission of providing meals, medical needs, micro-chips, and toys to dogs in need.
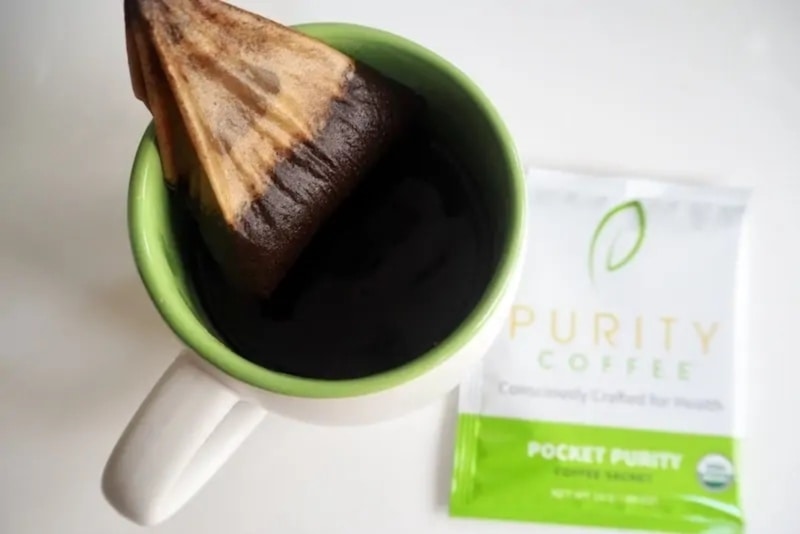
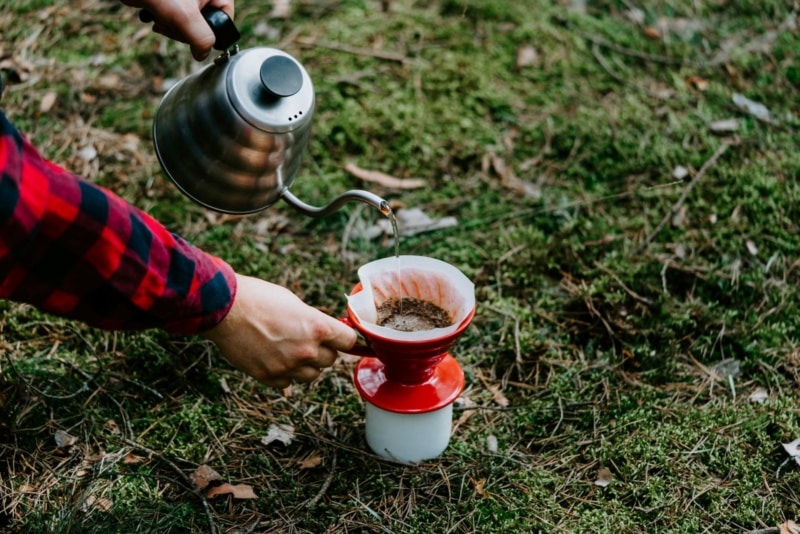
5. Single-Serve Pour Over Coffee
- Pros: Easy and delicious.
- Cons: You’ll need to dispose of both the bag and the grounds, which can be a hassle if you’re backpacking or wild camping.
- Best for: Those who value good coffee and convenience. Great when traveling light but still have access to disposal options.
If you don’t want to resort to instant coffee on your camping trips but you do want ease of use, then consider pour over coffee bags, which offer a convenient way to make a single cup of hot coffee on the road.
Pocket pour overs are effectively single-use coffee filters pre-filled with grounds that hook over your camping mug. As you pour hot water over the grounds, the heavenly bean juice drips into the mug, giving you a robust, complex flavor.
If you hate grittiness, a pour over is definitely for you! They come out incredibly smooth.
This is always my go-to coffee option when car camping because it’s so easy, really good, and I have easy access to a trash can.
The Best Single-Serve Pour Over
- Kuju: The original pocket pour over. Kuju was the first brand to bring the pocket pour over to the U.S. market, and they have continued to innovate their products to this day. They offer a variety of single-serve pour over options and excel in making quality grounds.
6. Pour Over Coffee
- Pros: Smooth, bold coffee. Minimal waste involved.
- Cons: Involves a minor clean-up process. Up-front investment in a pour over cup.
- Best for: Those who want great coffee and don’t mind the process.
If you want to cut down on your waste and really dive into the meditative process of a good cup of coffee, then consider the traditional pour over route. This cuts down not only on waste but also on costs in the long run!
Pour overs have been my preferred brewing method for as long as I can remember, and this is no exception when camping.
Whether you’re backpacking, car camping, or in a tent, a pour over tool is an inexpensive and accessible option.
You’ll need a pour over coffee maker, a reusable filter, a mug, water, and your favorite grounds. There are hundreds of different pour over contraptions on the market, so there is surely one to fit your needs and budget.
How to Make Pour Over Coffee While Camping
- Place your pour over on top of your mug
- Place a filter in the pour over and fill it with your favorite coffee grounds
- Bring water to a low boil
- Remove from heat and slowly pour the hot water over the coffee grounds in a circular motion, giving it time to drip into your mug below.
- Remove the pour over contraption from your mug, dispose of your grounds, clean out the filter with some water, and enjoy!
The Best Pour Over Coffee for Camping
- Sea to Summit X-Brew Coffee Dripper: This lightweight, collapsible, single-piece coffee dripper is perfect for backpacking and lightweight adventurers. It is incredibly intuitive to use, and the attached filter makes it really easy to clean.
- Stanley Classic Perfect-Brew Pour Over: This heavy-duty pour over is a great option for the rugged camper who wants a piece that will last a long time and hold up to the elements. This well-thought-out design features a reusable filter you can clean out after each use, internal markings to measure your grounds, and a sleek aesthetic.
- Kitchi Outfitters Lightweight Pour Over: This coffee dripper has stainless steel attachments that fit directly onto your mug of choice. This pour over is a filter of its own, and it packs into a waxed canvas storage pack to keep it safe and clean among your camping gear. It is lightweight and packs flat!
7. French Press Camping Coffee
- Pros: Makes several cups of coffee in one go
- Cons: More cleaning and more ground beans to dispose of
- Best for: When you’re camping at a site with plenty of water access and disposal options
A French press makes a delightful cup of coffee—well, actually, two to four of them, depending on the size of your press.
If you’ve got one at home, it’s almost certainly made of glass, and even if your camping is of the RV variety, it’s just not that practical to bring glassware on a camping trip.
Instead, invest in a camping French press, which is made of more robust materials and will easily replicate your at-home morning cup!
The only downside? There’s definitely more cleaning involved when using a French press, which isn’t ideal if you have limited access to water, and you’ll have more coffee grounds to dispose of, too.
Some people are a bit intimidated by the French press coffee method, which does take a bit of finessing to get right—but it’s a fairly simple process.
How to Make French Press Camping Coffee
- Heat your water to near-boiling—a full boil is too hot and will burn your grounds
- Add 1.5 tablespoons of grounds per intended cup of coffee to the brewing chamber
- Pour in the hot water and stir for ten seconds or so
- Insert the press’s plunger, but don’t push it down just yet—you want it to sit just above the water and grounds for now
- Let it brew for five minutes
- Finally, slowly press the plunger down to the bottom of the press – it’ll take about 15 seconds to do so. It’s a marathon, not a sprint!
- Now you’re ready to enjoy delicious coffee—just don’t think too hard about how you’re going to clean those grounds out of the plunger…
The Best French Presses for Camping
- Widesea Camping French Press 25oz: This inexpensive coffee maker available on Amazon is the perfect basic french press for camping coffee. Made from stainless steel and aluminum, it’s sturdy enough for your rugged adventures. It comes in at just under 8oz, making it a viable backpacking option as well.
- Stanley Adventure All-In-One Boil Brew French Press 32oz: This stainless steel pot from Stanley features a french press insert that lets you brew coffee. Remove the insert and it can also be used as just a pot, so this is a great versatile item for camp cooking!
8. Moka Pot & Portable Espresso Makers
- Pros: Makes a cafe-strength espresso that’s truly hard to beat. No waste and pretty simple cleanup.
- Cons: Can be easy to scorch your espresso if you’re not sure what you’re doing.
- Best for: Espresso drinkers who wouldn’t dream of dumbing down their bean water.
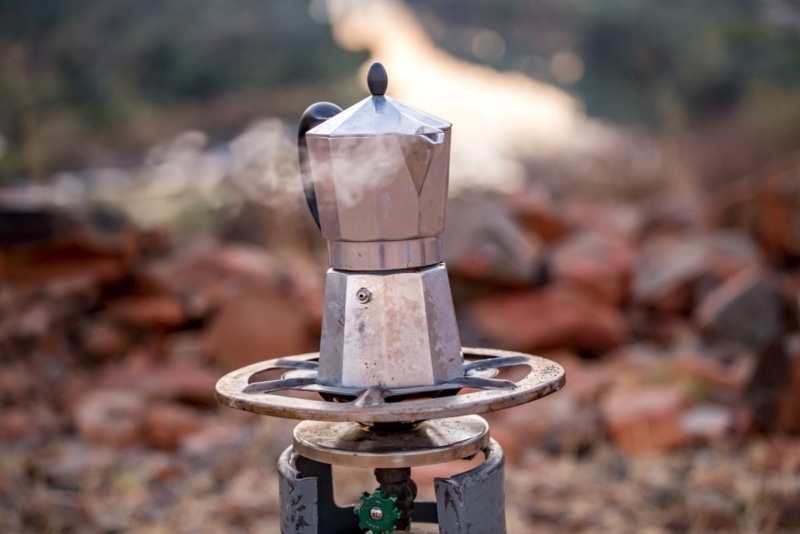
This is the ultimate on-the-go brewing device for the coffee aficionado. A Moka pot delivers a robust and bold Italian espresso even if you’re in the middle of the woods. And then it’s up to you whether you drink it as it is, add hot water to create an on-the-go Americano, or fancy it up as a latte with some milk.
The Moka pot has three compartments and is easy to use on your campfire stove. Water goes in the bottom, ground beans go in the middle, and as the water boils and steam rises, the resulting espresso collects in the top compartment, which can then be poured into your mug.
Even better? This stovetop espresso maker uses an inbuilt metal basket coffee filter, so you won’t have to mess around with paper filters. All you need is your fine espresso, some water, and a heat source!
How to Make Espresso While Camping
- First, heat your water to around 200 degrees Fahrenheit—that’s not quite boiling
- Use this not-quite-boiling water to fill the bottom chamber, paying attention to the water fill line
- Put ground espresso into the basket, using your finger or a spoon to level off the top (but don’t press down, as you don’t want them to be compressed in the basket)
- Pop the basket on top of the bottom chamber and attach the upper chamber
- Place the pot over low heat and allow six to ten minutes for the magic to happen (watch out for spurting liquid—this is a sign you need to turn the heat down)
- When it’s ready, pour a small amount of cold water over the outside of the brewing chamber to stop the brewing process
- Pour and enjoy as is, or top off with hot water or milk in your mug for a delicious fresh espresso drink
The Best Moka Pots for Camping Coffee
- IMUSA USA B120-42V Aluminum Espresso Stovetop Coffeemaker 3-Cup: Probably the cheapest espresso maker you’ll ever own. This budget Moka pot is a great option for camping coffee, as it is easy to use and clean, is durable, and makes some great espresso. It’s a bit dingier than more expensive options, but it definitely gets the job done.
- GSI MiniEspresso Set 4-Cup: Lightweight and portable, this stainless steel option is perfect for any outdoor adventure. It packs small and brews quickly, meaning you and your camping crew won’t have to wait long after getting out of your tents.
9. Percolator
- Pros: Great for making lots of coffee at once
- Cons: Not ideal if you don’t have a camping stove (or your fire-building skills could use some work)
- Best for: Van life aficionados who will likely have a stovetop to make use of, and will probably find themselves in a group of friends at some point on their travels
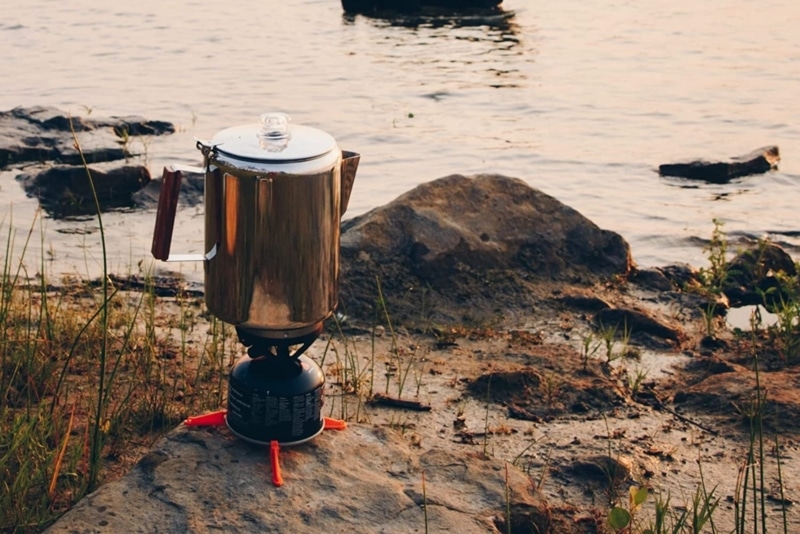
You’ll need a heat source—a camp stove or the hot coals of a campfire—to use a percolator, which is a classic when it comes to camping coffee.
A stovetop percolator works by funneling boiling water up a metal pipe into a basket that holds coarse coffee grounds, and the subsequent elixir of life drips down into the dispenser. This is quite similar to a Moka pot, but used traditionally for coffee instead of espresso.
You can find percolators in different sizes, which makes it a useful option for groups. One of you will ultimately become the hero of the morning for having been savvy enough to fill the percolator with coffee grounds and water the night before, ready to pop on the stove come sunrise.
Do note that making good percolator coffee might take some practice. Done wrong, it can be too bitter.
How to Use a Percolator
- Fill the percolator’s apparatus with cold water, and then reattach it to the device
- Using a ratio of one tablespoon per intended cup of coffee, fill the basket with your grounds, which should be coarse
- Attach the cover, ensuring the siphon stem is aligned with the sight glass
- Put the percolator over medium heat, keeping an eye on the sight glass to ensure that the water begins to erupt up through the siphon
- Remove from heat and let it work its magic for around ten minutes
- Once the coffee is brewing to your taste, remove the percolator apparatus (carefully!) and leave it for a couple of minutes so any errant grounds can sink before you fill your cup
My Best Percolator Recommendations
- COLETTI Bozeman Camping Coffee Pot: This absolute beast of a percolator makes nine easy cups of top-quality coffee! It’s a bit much to take on tour with you, but if you’re not trying to cut down on space or weight, it’s perfect for camping with a group of friends.
- Farberware Yosemite Coffee Percolator: This is a serious bit of kit that’ll make eight cups of coffee in a pinch, ideal for groups of campers. Made of stainless steel, it’s rugged enough for your adventures while making a great brew.
10. DIY Coffee
- Pros: Lightweight, no-frills, and impresses everyone at camp.
- Cons: Coffee is’t as strong as other methods, and if you don’t use the right floss it can change the flavor of your drink!
- Best for: Those who love trying new DIY projects and want decent tasting coffee without the price tag.
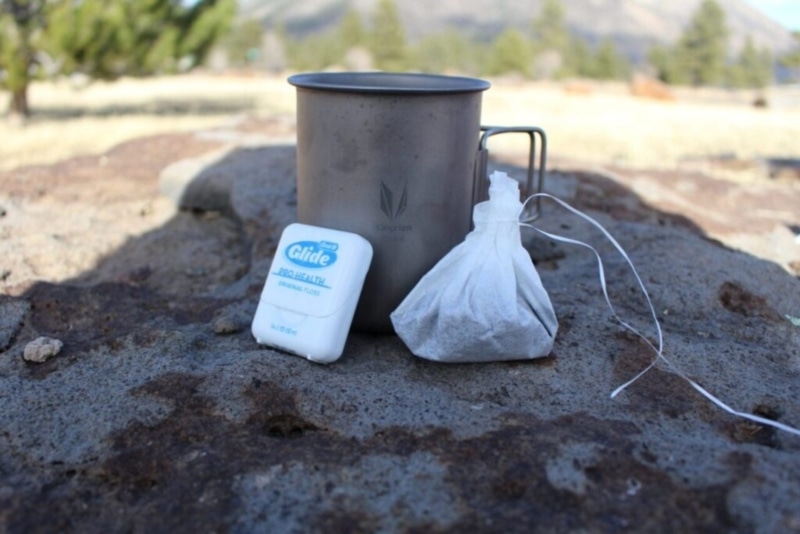
Ah, maybe my favorite dirtbag way to make coffee (and impress everyone at camp). If there’s anything I know about the outdoor community, it’s that we’re scrappy. That’s no exception when it comes to jimmy rigging a coffee setup.
One of my favorite DIYs, perfect for backpacking, is the dental floss method. All you need is your mug, a coffee filter, and some dental floss (or, if you prefer, some butchers twine) to turn any grounds into some perfectly drinkable coffee.
Simply place your grounds in the paper filter and tie it closed with floss (preferably not the mint-coated variety). Now you’ve got a ready-to-use coffee bag that you can steep in hot water for a few minutes for the perfect on-the-go beverage.
You can make these bags at camp, or better yet, make them before you head out on your trip so they’re easy to grab and go in the morning! This method is really cheap, easy, and quick.
It’s basically the dirtbag version of coffee in a bag.
What You’ll Need to Make Camping Coffee
You can pre-program your SatNav and spend hours curating your road-trip playlist, but if you haven’t taken the time to pack up all the supplies you’ll need for coffee on your camping trip, it’s sure to be a flop.
Here are some of the essentials we recommend popping in your gear bag, all of which will help make those crisp, cool mornings magical. Even better? You can find many pre-made kits of camping coffee supplies, which will save you shopping around for each element individually.
Good Coffee Beans
If you want to brew your own coffee while camping, you’ll need to source your beans. This means making sure they’re at an appropriate level of ground (you’re making freshly ground coffee, after all) and then disposing of the things, too.
You’ve got a couple of options when it comes to sourcing them. Firstly, you can buy bags of fresh grounds, which is convenient but gives them less shelf life, and you’ll need to make sure you buy the appropriate coarseness of grounds for your coffee maker.
Or, you can buy beans and a hand grinder, which will keep your coffee fresher for longer and means you can change the coarseness up if you’re using different varieties of coffee makers on your trip.
Finally, you need to think about disposing of them. Coffee grounds are biodegradable, but it’s pretty poor form to just leave them hanging around in steaming, stinky piles—and there are plenty of studies out there to suggest that it can be harmful to certain plants and insects. So let’s take care of the places we’re visiting and be prepared to leave no trace.
Leave the area as you found it, and pack out your grounds. That means you bring them with you until you get to a trash can or compost bin.
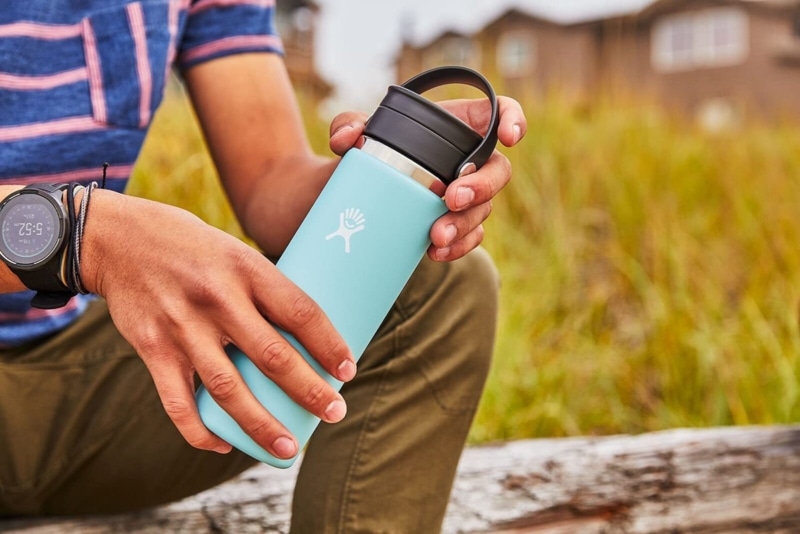
Insulated Coffee Mug
Making excellent coffee is all well and good, but if it gets cold before you can enjoy it, what’s the point?
Though the old enameled steel mugs that look so good on Instagram are aesthetically delightful, they don’t actually tend to help your drink maintain its heat. Paper cups, similarly, are pretty depressing and present an issue with disposal. And don’t even consider trying to pack a mug from home, unless you like finding shards of ceramic in your underwear.
Instead, it’s well worth spending a little more to get yourself a seriously robust insulated coffee mug.
Look for screw tops that will stay secure while you’re on the move. I love a YETI coffee mug or a HydroFlask for maximum heat retention while still enjoying a delicious cup of coffee at a slow and steady pace.
The Best Insulated Camp Mug Picks:
- Fifty/Fifty 15oz Camp Mug: This double-wall insulated camp mug is a classic looking cup perfect for keeping your drinks piping-hot, even after you spent an hour making breakfast for the rest of camp and forgot about the coffee you brewed. It comes in a ton of different colors and features a splash-proof slide lid.
- YETI 18oz Rambler: This leakproof, vacuum insulated bottle lets you take your hot drinks with you on any cold adventure. Larger and taller than a mug, this bottle fits perfectly in a backpack’s water bottle holder. Simply pour it in, seal it up, and have a hot drink ready for you all day.
- Hydro Flask 16oz Coffee: A classic brand with an innovative design. This is one of my favorite travel mugs, as it has an easy twist and sip top that is actually leakproof. It fits the perfect amount of coffee and keeps it warm all day!
Water Boil System
One thing you need for your hot drinks while camping is a heat source to boil water.
There are several options, depending on if you’re backpacking, tent or car camping, or in a van. You could have a water boiling system, like a jetboil, a stove (portable or a large one), or even just a campfire (depending on your brew method).
There are hundreds of water boil systems on the market today, but here are my top three recommendations:
- Jetboil Flash Cooking System: Jetboil is a long-time camper favorite. This compact system boils water in mere seconds, meaning you don’t have to wait long to have a hot cup of coffee in your hands. If you’re the type of camper who wants speed and a convenient kit, this is definitely the one for you!
- MSR PocketRocket: This tiny, lightweight piece is the perfect backpacking option for quick, easy camp cooking. Its impressively small size makes it great for those looking to cut down on weight and space. Simply secure the piece to a fuel canister, have a lighter on hand, and you’ll have boiling water in about three minutes!
- FORE WINDS Rugged Camp Stove: This camp stove is perfect for tent and car campers, and even van lifers who need an external range. It’s a rugged single burner, propane stove and is my favorite option for a percolator or Moka pot. It goes without saying that it’s also great for throwing a pot of water on to boil for most other methods.
Coffee Grinder
Okay, okay, bringing pre-ground coffee to camp with you is arguably the easiest option, and it means you’ll have one less thing to carry. But consider this: pre-ground coffee loses flavor quickly and can go stale, particularly in changeable temperatures. What yields a decent brew on day one could be bitter, dull, and disappointing by day three.
Whole coffee beans tend to travel much better, and won’t lose their intensity even if you’re not very careful about how you store them. It’s a perk that’s worth mentioning, too, that spilling beans in your camping bag is a lot less irritating than spilling a bag of gritty grounds!
Carrying beans does mean that you’ll need to pack a way to grind them. You’ll find plenty of compact, battery-operated or manual grinders on the market, which will allow you to prepare your beans and enjoy tastier, fresher coffee in the morning.
Of course, different ways of brewing coffee require different types of grounds, so make sure you know whether you need fine or coarse ground coffee, and that your grinder is capable of doing what you need. Once you’ve nailed the system, you’re pretty much guaranteed incredible camping coffee.
Great Coffee Grinders
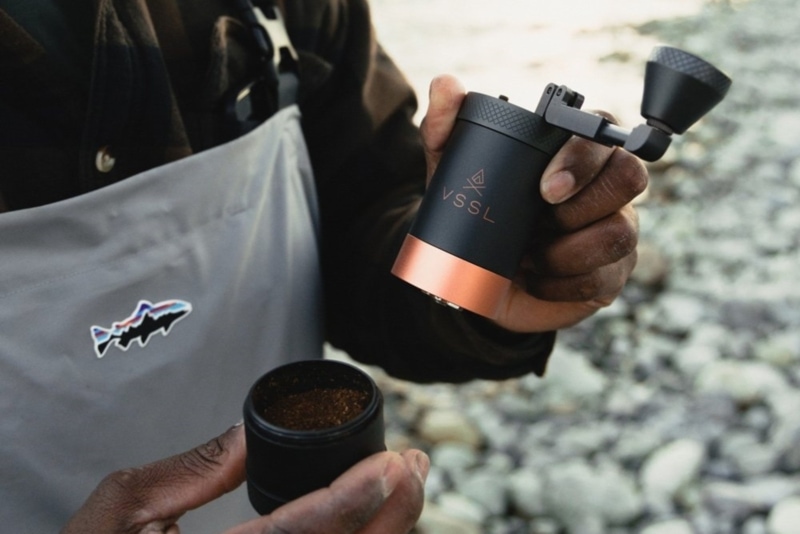
- VSSL Java Coffee Grinder: This is the premiere grinder that coffee lovers praise. It is great not only for camping but for your everyday life. It’s on the pricier side, but it truly lives up to the quality and precision it boasts. This is a great alternative to something hefty that requires a power source like a Burr grinder.
- Snow Peak Field Barista Coffee Grinder: This compact type of hand grinder is perfect for camping. It’s durable, packs well, and does the job well. Simply place the beans in the top compartment and turn the handle to grind!
How Coarse Should Your Coffee Be When Camping?
To find the right grinder, you need to know how coarse or fine to grind your beans. This depends on the type of coffee you are brewing and your own personal preferences.
Check out this grind chart, which will help you determine the best grind size for your needs.
The Coffee Grind Chart for Campers
- Extra Coarse: The extra coarse grind size has the largest-sized ground coffee particles, resembling peppercorns. The more coarse a grind, the less bitter it will taste. An example of an extra coarse grind in coffee terms would be cold-brew.
- Coarse: The texture of coarse ground coffee is somewhat finer than medium grounds. The color and consistency are similar to sand.
- Medium Coarse: Take a close look at a scoop of medium-coarse grounds, and you’ll notice that it looks like the consistency of sand. While extra coarse and coarse grinds are needed for the longer steeping of a cold brew or French press, the medium-coarse caters to cafe solo or clever drippers that require less extraction time.
- Medium: For a normal cup of drip coffee, many cafes will use a medium grind setting. Its texture is somewhat similar to sea salt.
- Medium Fine: The medium-fine grind size is a good compromise between the sizes needed for drip coffee and espresso—ideal for camping coffee.
- Fine: In pre-ground packages, the most frequently used grind size is fine. It’s also a popular choice among baristas for espressos at coffee shops. The finer the grind, the more uneven it will be. It’ll have a texture similar to table salt.
- Super Fine: The texture of a super fine grind will be like powdered sugar. If you enjoy drinking very finely ground Turkish coffee, you’ll be using extra-fine grounds.
Camping Coffee FAQs
How Do I Make Coffee While Backpacking?
My top suggestions are an AeroPress, a small pour over, or the Jetboil attachment for making cowboy coffee.
These are all really packable and lightweight compared to most other brewing options. They are also all low-waste options, so you have less to pack out!
When camping you likely have access to a camping stove, a fire, and all sorts of gadgets to make your brew come to life. But if you’re backpacking, your options are more limited, and it’s likely you’ll only have a travel mug to help you get the job done.
Fortunately, many backpackers have come before us and fine tuned the art of backpacking coffee. As mentioned above, many coffee makers are compact and lightweight enough to take with you on your adventures into the backcountry.
However, if you really don’t want to bring any kit with you, I’d suggest opting for instant coffee, coffee in a bag, or single-serve pour over packets. These are single-use options that are lightweight and only require you have a heat source to boil water.
Can I Make Coffee Over a Campfire?
It’s pretty easy to make coffee over a campfire. In fact, the hardest part really is making the fire itself.
Cowboy coffee lends itself particularly well to this, partly because it tends to be made in robust, multipurpose pots that can withstand the heat, but you can use the hot coals for percolators, too.
Generally, though, you don’t want to just thrust your coffee pot into the flames. This can cause the water to overheat, leaving you with a burnt, acidic taste.
Final Thoughts on How to Make Coffee While Camping
Whether you prefer coffee in its simplest instant form, or you want the complexity of a good espresso, you don’t have to limit your options just because you’re out in the wilderness.
All it takes is a few sensible upgrades to your camping kit, plus a commitment to investing in good-quality beans or grounds. Stick to this, and you’ll be able to enjoy incredible camping coffee that’s as good as the cup you’d make at home, but with an even better view.
Do you have another method of making your camp coffee? Let me know in the comments—I’m always down to try new ways of brewing my bean juice.